Monday, February 28, 2011

5th 4sq completed

no. 5 was my first blanket made for a non-family member. i think it's my favorite so far. i adore those meadowsweet 2 fabrics by sandi henderson that i used. looking at them while doing the handstitching on the edges was such a pleasure. in a way, i'm a bit sad to pass it on. it makes me think i better stock up on some more meadowsweet.

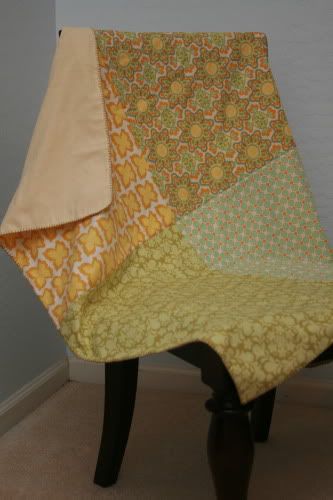
i forgot to turn the corner so you can see the back. i used a soft yellow that may or may not have been in the fabrics' palette, but it coordinated well. i wanted to use the dark celery color in the prints to edge the blanket, but couldn't find a perfect match in floss. so i settled for another dark khaki kind of green that complimented the print.

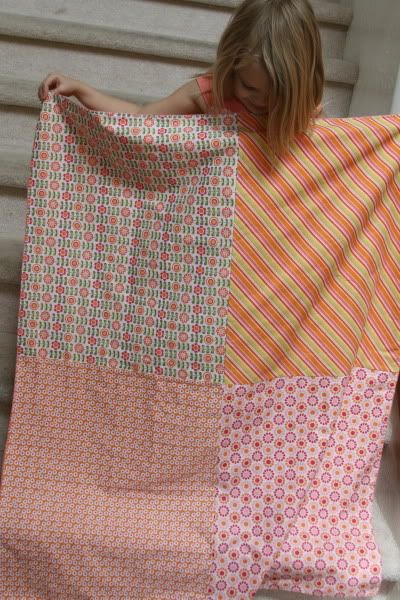
a better look at it laid out flat. i'm still working on how to best display these for photos. and working on my product-type shots period. people i'm comfortable with. my stuff photography needs work.

a close up of the dreamy meadowsweet 2 prints and colors. very nice! and my seam matching is pretty dang good, too. if i do say so myself.

assistants for blog updates

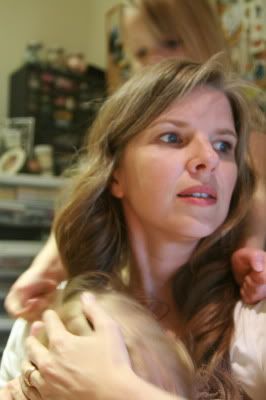
tonight while trying to post and work on parts of this blog, i have not just one, but two visitors sharing the chair with me. mommy first, blogger and sewer second. i find it amusing to take some self timer photos of the situation. it captures the chaos of the moment pretty well, i think.


one already behind me
inviting the other onlooker in

now i have one in my lap to type around

the more the merrier? not getting much accomplished on the blog front, but it's fun trying. i'm adding a glossary of sewing terms page, rearranging the 4 sq blanket page, and working on the next part of the tutorial. all with lots of help from these ladies!

4sq blanket no. 1

my first personal attempt at a 4 square blanket was for my niece, liberty. with her adorable name, i knew she'd probably be getting her fair share of red, white, and blue items over her lifetime, so i chose these bold & sassy riley blake fabrics i had in my stash. i didn't know a thing about squaring fabrics or seam allowances or any of that stuff. i didn't even have a pattern. i just gave it my best guess and everything worked out well.

the orange flannel i got for the back was not an exact match, but it was close enough. i chose pink floss for the blanket stitch. i have to laugh at my stitching in spots - i didn't exactly get the size of the stitches consistent. but that's okay.

all wrapped and ready to gift. i like to roll the blanket up in a way that all four fabrics are showing.

when my kids saw the blanket, they said, "that's not a liberty blanket. it's not the right colors!" fortunately, my s-i-l disagreed and loves the blanket. her orange loving best friend is totally jealous, too.

4sq blanket tutorial, part one

as i'm starting my sixth 4sq blanket, i'll be photographing the process and sharing the "how to" with you. it'll come in bits and pieces as i work on the blanket, but since it must be completed by thursday night, it shouldn't take too long. i'll be writing for the complete beginner, with lots of details that i hope will answer any questions you might have. if something is not clear, please let me know!


first, we'll start with supplies.

you'll need 4 coordinating fat quarters of 100% cotton material for the front
one yard of coordinating cotton flannel for the back
thread
two skeins of embroidery floss for the blanket stitching around the edges. (there are two different colors of floss here only because i was debating which to use. any thoughts?)

if your fabric source doesn't sell fat quarters, you can get 1/2 a yard and cut it in half across the width. you'll then have two fat quarters.  normally, when you purchase fabric off the bolt, a 1/4 yard would be cut skinny along the length, from selvage to selvage, measuring 9" by wof (width of fabric), which is commonly 45" or so. but a fat quarter is 1/2 a yard cut in half across the wof so it measures 18" by 1/2 wof. you get the same area, just arranged differently.

on the left is a fat quarter, on the right is a traditionally cut 1/4 yard. you can see a fat quarter is half the length, twice the width. it's short and fat, hence the "fat" quarter.

everyone understand what a fat quarter is now and how to make one if you can't buy it cut that way? good.

step number two once your supplies are assembled will be to prepare the fabric.

at this point, the debate to "wash or not wash" comes in. there's lots of people on both sides of the fence. i've even done both with this blanket. i prefer working with unwashed materials. the theory is that prewashing preshrinks the fabric, saving possible problems later. unwashed fabric is easier to work with. the blankets i've made all used premium fabrics, so there wasn't a problem with shrinkage after washing. totally up to your personal preference. i like quilter carrie nelson's compromise. when she presses all fabric before using, she makes sure to steam them. this causes fabrics that will shrink to shrink some before you start without having to wash them. that's what i do.

so if you have all materials ready, steam press your fabrics, then square them off with your rotary cutter or make a paper pattern and cut them out. i'll explain how to do that next! go get your stuff and press it, then see me back here.

Friday, February 25, 2011

mommies multi-task

a few years ago i started doing my online writing without caps because i was often on the computer answering emails while trying to nurse a baby. it just simplified life a bit for me. the habit stuck and still comes in useful, especially when i'm required to do some holding and typing simultaneously.

there's nothing like being a mom. it comes first in my book. but sometimes it's nice to be able to do small mommy tasks at the same time i'm doing something i wanted to do for me.  i'm always up for a cuddle with a sweet little warm body while i type a blog post. for a while i've brought reading with me while i sit by the tub and the kids bathe. now of course, my sewing table is right there and i sew while they get clean. being a hobby photographer and a mom goes together perfectly, too. what more beautiful, motivating subjects could you find than your own kids?

 moms are pretty good at multi-tasking, even when it's not combining fun with work. but there are always the times when we have to stop our tasks and focus on the children, even if it's just for a snuggle when they're sleepy or when they need a story. i don't want them to think i'm not available when they need me or that they are less important than what i'm doing. sewing is not compatible with baby holding. that's when i have to put their needs first and put the stitching down. reminding myself how fast my motherhood years have already flown by and how short are those left helps me shift my focus back to them.

i just read a quote from the famous english preacher and hymn writer, john newton, author of amazing grace. he was constantly interrupted by parishioners needing his assistance. he said something to the effect that "when i hear that knock on my door, i know God is going to teach me something." i'm as guilty as anyone of ignoring my kids at times or getting grumpy and frustrated when they interrupt my creative flow. i'm trying hard to teach myself not to be.

designer heather ross just posted a funny description of her dog's reaction when time slips away from her and he feels neglected. she's pregnant with her first baby. i wonder how she'll cope with mommy multi-tasking? we all have to find our way to a balance that's right for us. congratulations and good luck to heather. i'm sure she'll be brilliant with mommy multi-tasking just like she is with all her other creative pursuits. can't wait to see her new children's book!

Thursday, February 24, 2011

blanket stitch tutorial

i adore blanket stitch. it's simple with so much rustic charm. (and i just realized my muddled mommy brain has been inexplicably calling it "backstitch" for a few days - why, oh, why?)  it can be used to edge many types of projects, not just blankets, and also for decorative effect on flat items like applique, but that will be dealt with at another time. here's how to blanket stitch an edge, like on my 4sq baby blankets.


tie a knot in the end of your thread/floss. bring your needle up between the folds of the two fabric edges.  pull needle and thread all the way through. when you get the knot to the fabric, grasp the fabric close to where the knot is with one hand and gently but smartly tug the thread through where it is exiting the fabric. you will hear a satisfying "pop" when the knot goes through. this is called "burying the knot." be careful you don't tug too vigorously or you will pull it completely through the fabric and possibly make a hole.


on the front side that is facing you, insert the needle from front to back of the fabric about a 1/4" inch below the fabric's edge (or whatever depth of stitch length you desire). grasp the thread with your non-needle hand and pull the thread behind the needle in the direction your stitches will be moving in. here, i'm stitching right to left, but you can certainly stitch left to right if you want. whatever's more comfy for you.
i pinch the thread down along the seam and hold it there while i pull the needle and thread through. once you have the thread pinched down with the needle between the thread and the fabric, pull the needle and thread through to the backside until the stitch is tight and complete.

i let go of the thread with my pinching hand once i get close to finishing the stitch.

a this point, if you notice your thread is not inside the loop being created, stop and pull your needle through the loop or you will miss the stitch. this can happen when you don't keep the thread all to the side you are moving toward as you start your stitch.

pull until stitch is snug, but not too tight, pulling straight up and away from the seam.

if you somehow missed and didn't catch the stitch, you can loosen the botched stitch up a bit and run the needle under the stitch, making sure to catch it and correct the miss.

then start again by inserting the needle in the front of the fabric and repeating the same stitch again always making sure to keep the tail of the thread (end away from the needle) pulled to the side in the direction you are stitching. if you don't keep the thread to the side you are moving toward, you can miss the stitch and end up with a diagonal stitch instead. just correct as described above.

when you have a little more than one needle's length of thread left, tie off and bury your knot. this is not a time to be frugal with your thread. quite often i try to eek out a stitch or two more past where i know i should stop, and i always regret it. you need enough thread left to work with, especially to bury the knot. otherwise you will find yourself very frustrated and spending a lot of extra time repeatedly rethreading increasingly fraying thread and trying desperately to get it tied off. no fun. go ahead and "waste" that last few inches of thread.

my method of tying off is not the best, but i know of no other. please, anyone enlighten me who knows a better way. here's how i do it:

i loop around the final stitch, making sure to pull my needle through the loop to create a knot on the thread.

about a 1/4" away from the knot you just tied, wrap the thread around the end of the needle twice. pinch the thread where you just wrapped it and pull the needle through your fingers, keeping it pinched. this makes a knot.
then insert the needle in the seam under the last stitch.

push the needle between the two fabrics for an inch or two, making sure not to peek through either side of fabric until you are ready to exit. then pull needle and thread out of the fabric and tug until you hear the "pop" of the knot being buried. it's very important to make sure you get the knot buried. sometimes i have to use the needle to manipulate it into the seam if i just can't get it to pop.

when the knot is buried, trim off the thread, making sure not to cut into your fabric. tuck the little ends back in if you have to and smooth over the hole. i pull the thread out a little more than necessary, which makes the fabric pucker a bit, snip it, and then pull the fabric smooth and the tiny bit of end left sticking out will pull itself into hiding.

to start up the next length of thread, tie off the end with a knot like you did in the beginning and bury the knot as before, inserting the needle an inch or so back from the end of the last stitch.

OR insert your hand into the hole left open and place your needle in position from the inside.

now just pick up where you left off, stitching as before.


don't forget to hold down that thread along the seam in the direction you are moving and to keep all the thread to that side of the needle.


for how to turn a corner, go here

once you get the hang of blanket stitch, it moves along nicely, falling into a wonderful rhythm. i like to edge my 4sq blankets when i'm at my kids' after school activities, while talking to friends, and i've even started watching a movie or two with the kids when i need to get some stitching done. then again, it's a nice way to busy my hands while my mind roams free, contemplating life and the cosmos. simple but deep stuff!

please let me know if this tutorial made sense to you, how your blanket stitching adventures go, and ask any questions you might have. i'll sure try to answer them.

next up will be a full tutorial on the 4 sq blanket, as requested by shannon. i just got an invitation to a baby shower next week and will be making a new blanket for the occasion, so i'll photograph as i go and get the tutorial posted shortly there after.

sew on the go

yesterday i worked on this:

while watching this:

that's my oldest daughter's riding lesson, in case you weren't sure. i love this hour of the week where she rides and i sit in the shade of the stable, smelling fresh country & horsey smells, reading or sewing. it's nice for both of us.

children's many after school activities are a perfect time to squeeze in some sewing, particularly hand sewing, which i truly enjoy.

to be a good boy scout mommy, i come prepared with this:
this is the tin my sewing shears came in. i've packed it with a few essentials for handsewing: my tiny snips, a variety of needles, some marking tools, and thread or floss that goes with the projects i'm working on.

at home, under my sewing table, lies a basket with the tin and the projects that i can grab to go when i'm going to have the opportunity to sew as i wait.

right now it holds a small quilt i'm handquilting for my 4 yr old (pink dots), the flower appliques for "at last" quilt that need backstitching, and a doll blanket my son made for his sister (with me) that needs the seam finished off by hand. anne's 4 sq blanket belongs in here, too. see, lots of nice projects to grab when there's going to be a moment available.

now all i need is a bag to carry it all in. currently i use a shopping bag from the quilt store, which is completely functional and a good way to reuse the bags. but i'm a sewer, dang it. i should sew something cute to carry my stuff. i'll add it to the growing list.

by-the-way, whilst i was sewing and horsey watching yesterday, i also snapped photos for a blanket stitch tutorial, requested by commenter "RandM" last week. it'll be up today or tomorrow, barring any unforeseen relapses of baby illness.

Wednesday, February 23, 2011

to rip or not to rip

i was having a terrible time getting a 1/4 yard of this fabric to line up for squaring. you're supposed to line up the selvages, pin them together, then smooth out the fabric to the center fold. the selvages for this piece were particularly wonky and no matter what i did, i couldn't get the piece straightened out. time to consult a book.

 i remembered seeing instructions for resquaring a distorted piece. the first thing the ladies recommended was tearing a 2.5" strip off your fabric to find the grain. it's the only place in all the dozens of books i've read where i've seen this recommended, but they're experts so i gave it a go. and was instantly sorry. i really don't think it worked for me. maybe they were using thinner, less-premium, non-designer fabrics that are easy to rip. i don't know. all i do know is it made a mess out of my material, distorting it all along each side of the rip.

then again, now that i think about it, i was able to make a more accurate guess at where the grain lay and i did get the fabric to straighten out decently with that guess in mind. so maybe, in desperate situations like this, ripping isn't a total loss after all.

but who am i to judge? i have major problems with recognizing the grain lines and making straight cuts, two essential skills to sewing in general and quilting in particular. quilting is all about accuracy. extreme accuracy. well, it's supposed to be. not for me. my motto is "it's okay! wonky is nice." or something like that.

making time, finding balance

since starting this blog, i've been applying my brain to how i can eek out more sewing time in my already overfull life. i want my hobby to stay in it's proper place yet get some attention. i'm prone to go off the deep end and ignore everything else when i have a project going, so i had to come up with some guidelines for myself to keep the balance. yesterday i hit on a few good strategies.

1. first things first. i do not allow myself to touch a project until the basic, essential tasks are accomplished for the day. that means personal scripture study, feeding & dressing my children, getting their school work moving along, not necessarily having the entire house spic and span. knowing the most important things are taken care of allows me to focus on my projects without any feelings of guilt nagging away while i try to create.

2. managing time.  get up before the children do! i work faster and better, get stuff done when there are no little people around. i also schedule time in my day where i can focus on sewing because it's important to me. if i know i've got a bit of time coming, it's easier to be patient and focus on what is at hand instead of always thinking "when can i sew?!" when i do give myself time to sew/blog/read, i set time limits and really try to stick to them, with a little flexibility to allow for a good stopping place.

3. do it right, right away.  i have to remind myself my children come first and their needs are important. it always saves me time in the long run if i am willing to stop immediately and take care of their needs. then they aren't hanging around nagging me, whining while i get more frustrated and upset. instead of brushing them off, i do what they need right away, and do it fully and correctly. we're both happy and i can go back to work in peace. last night was a perfect example of not doing this. it was bedtime and i sort of gave up, telling the kids what to do, not helping them do it. then the baby fell asleep before getting her breathing treatment and it took a lot longer to do it with her since she was so cranky to be woken up. if i'd just done it all correctly, i'd have saved a lot of time and stress for all of us.

4. be prepared for small bites. if i do a bit of prep work and have stuff set out to work on, i'm able to take advantage of small bits of time that come my way. like yesterday, in the morning before the kids were up, i laid out the top portion of the quilt i needed to stitch on my bed (above photo), then whenever i got a moment, i ran a piece or two through the machine. i got several bits sewn together this way and was able to finish all of it after the kids went to bed.

5. remember what i really want. it's so easy to fritter away time in your day doing nothing. if i ever find myself doing something meaningless, i say to myself, "wouldn't you rather be sewing?" and stop. last night i was going through the junk mail and started browsing catalogues. then i realized, "hey, you could be sewing. you don't really want to look at pretty stuff you don't need and aren't going to buy." i threw them in the recycle bin and got back to my machine. we all have the same number of hours and minutes in a day. being mindful of how we spend them can help us spend them more wisely. if you ever think you don't have time to do something you want, look at what you are doing instead and make choices.

Tuesday, February 22, 2011

always learning

my initial cuts are done and i've been able to squeeze in some time to piece together "out on a limb" last night and today. i've remembered/relearned a few things in the process:

1. always check the bobbin thread before beginning to sew because it's really annoying when it runs out unexpectedly in the middle of a seam.

2. it doesn't pay to skimp on thread when you cut off a piece after sewing. if i don't leave the tails long enough, the thread invariably jumps out of my grasp when i begin sewing again and i end up rethreading the machine. waste of time. thread is inexpensive. my time is not.

3. clip excess threads and press seams as you go. i prefer this method to doing it all at the end and risking forgetting later on.

4. i dislike cutting. i really stink at it actually. can't seem to get my cuts squared and straight for the life of me. i'm beginning to suspect my rulers. surely i can't be that inept at lining up edges and running a rotary cutter down the side! thank goodness for precuts they make the whole process remarkably easier. totally worth the few extra dollars you pay.

5. slow and steady wins the race. or makes for straight seams. if i sew at an even, slow pace rather than racing through my stitching, it's much neater and more accurate. my darling machine tends to pull to the left and going fast gives me very little control. once again, an ounce of prevention saves a pound of cure, or seam ripping and resewing.

6. there's nearly as much pressing involved in quilting as there is cutting and sewing. every seam must be pressed. having a craft iron that doesn't shut off after intervals of unuse is wonderful, but requires extra caution with little ones about.

just a few things to remember when working at the machine.

online fabric

i'm fairly certain my postal carrier hates me. but right now i feel like giving him or her a huge squeeze. packages in the mail are so nice, don't you agree? and a box of fabric contains endless possibilities.

like many newer homes, we have to get our mail from a neighborhood communal box, much like apartment complexes have always had. no more walking out my front door to my own box. even better was a really old house we used to live in that had a mail slot in the front door. i didn't even have to get dressed to fetch the mail, it simply fell on my living room floor. nowadays the postal service is more frugal and efficient. i have to keep track of a key, get dressed to a reasonable level, and walk four houses down and around a corner if i want mail, most of which is government-subsidized junk mail. more paper for the bird's cage.
our box is usually stuffed to it's gills by the time we check it every few weeks. there's often a notice saying they're going to return all our mail to the post office for holding if we don't empty it. our primary mail key has been missing for a few weeks, so even though i was expecting mail at the end of last week, i couldn't get to it. on saturday, i grubbed up five sets of unidentified keys that might possibly be the spares and tried to "open sesame" with no luck, standing in the rain the whole time. my treasures remained locked inside my box all because i couldn't locate the key.

monday morning, the mr. gave it a good hunt down since he needed his business mail (he works from home) and found the spares. joy! i threw on the first clothes i could touch and flew to the mailbox. it did not disappoint. not only was there one package box key hiding in my over-full inbox, but there were two! i'd filled up both spare boxes designed for packages, probably for a couple days. that's why i'm pretty sure my mail carrier hates me.

somehow i managed to get all three packages plus the mail balanced between my arms and chin (barely) and waddle home down my street. i'm sure i was a sight to see. the pants i'd grabbed were low rise and the shirt was an old one from the "let's show our belly a bit" era a few years back. (so glad that has passed.) it was an uncomfortable stagger home, but the fruits of my labor were well worth it.

first, from cia's palette:

a few yards of this and that, beautifully packaged, as always. i've ordered from her a few times. my yardage is always nicely folded and wrapped with the pretty vintage sewing label sticker sealing the deal. cia also includes a small cut or two of something new you didn't order (the floral piece on top.) i like that. i've talked to her on the phone before because she's called me with a question about an order. she's very courteous and pleasant. i like her fabric selection because it is rather different than what my local store carries, in many instances. i find her site easy to manage, although occasionally i have a hard time getting back to my cart if i'm not on the right page. overall, she's a pleasure to work with.

in packages no. 2 and 3 from the quilted castle:
two new quilt patterns and a whole mess of fabric. i raided their clearance section and "end of bolt" deals. i find that when a fabric line has been out for a while, stores that like to move stuff through will begin marking items down. i picked up some things that coordinate with fabric i already have for a fraction of the original price.

i've ordered from castle a handful of times and always get great service. the very first online order i did was through them. i was very nervous after it came because a whole fat quarter package was missing. but i emailed them and they completely believed me, gave me the option of shipping it, refunding my card, or a store credit. wonderful customer service. i like the way their site is arranged. you can shop by company, designer, collection, or even types of precuts.

after a save up a bit again, my next order will likely be to purl soho, the trendy shop in nyc. they've got some nice things i can't find here or on other sites. they come highly recommended in several books, so i'm anxious to give them a try. too bad their site is so slow, though. and the search feature has given me trouble. still, i've got my eye on some items.

i'm no expert, but my opinion on online shopping is that it's great for items you've seen before and know what they will be. often colors and/or pattern sizes are hard to judge accurately on the computer screen. i've gotten items before that were much brighter or differently colored than i'd anticipated. knowing exactly what you're getting will really help make for a good experience.

it's also a great way to pick up sale items. sometimes i take a chance on the sale items i might not have seen if the price is good. it's a tiny bit risky, but fun. what's popular in your local area may not be moving elsewhere and you can get some surprise bargains.

if you have your heart set on an item you must have, you'll probably find it online somewhere. etsy has tons of fabric offerings, even some small custom collections not found anywhere else. but if you go hunting for a specific hard to find item, be prepared to pay a premium and some hefty shipping. it's just not worth the shipping sometimes to get a yard or two.

i save up money to do bulk orders because many shops will throw in free shipping if you spend a certain dollar amount, ranging anywhere from $35 to over $200. i don't bother with the shops that don't ship for free. i haven't been that desperate yet. i see no reason why they can't do it if you're going to spend a nice chunk of change with them.

i'm looking for some sandi henderson i couldn't find anywhere else, so maybe i'll have some new sites to review in the near future.

anyone have a favorite site they'd recommend?

Monday, February 21, 2011

attn: followers

to all my new followers, thank you! i sure hope you find this worthwhile browsing on occasion. you all have a treat coming from me, but i need some info first. leave me a comment with your favorite fabric designer, your current favorite line, or at least tell me which of the fabrics i've featured so far you like so i have an idea what to send you. i'm not making any promises, but i'll try to match you up with something along those lines.

***edited to note: first 5 followers are shannon, jen, bran, amy s., and mel.
"jen" and martha, please email me your contact information so i can mail your surprise when it's completed.
thanks again, ladies. i'm excited to make new friends here and share my adventures with you. i'd love this to be interactive, so please feel free to comment all you want and i'll respond as best i can directly in the comments section of the posts.

Saturday, February 19, 2011

church bags

this past Christmas, in an effort to simplify and enrich our gift-giving experience, i decided to try handmade giftgiving. we limited it to the children's gifts for each other so they were assured a non-handmade gift of something "cool" they might really want from their parents and santa. they were all pretty new to sewing, so i was involved to varying degrees with what they made. i think this week i'll share with you their items.

first up are the simple but sweet bags my 6 year old son, bear, and i made for his little sisters.

the girls use them to take a few quiet items, a box of wipes, and a hairbrush to church. bear picked out the materials himself from my stash. he thoroughly enjoyed pressing the fabric. repeatedly. definitely his favorite part. i cut the bags out myself, a matter of a few straight lines. bear's not ready for the sewing machine just yet (or more accurately i wasn't ready to teach him yet as we were strapped for time at the point these were being made) so i had him run the presser foot of the machine and snip all threads for me. in this way, he was involved and i had some control of the outcome.

a closer look at the fabrics and ribbons used:


ribbons from strano, purchased at two peas in a bucket (dot com); fabric is hushabye, tulla pink for moda.

each bag took less than a fat quarter of two fabrics (one for the outside and one for the inside) and a yard of ribbon, which is what i had on hand of each ribbon. next time i'll get a bit more ribbon so i can make a bow for each side of the bag, and make them a little bigger. maybe a yard and a half. if you don't count the time i sewed a fabric on backwards, i probably spent about 30 to 45 minutes per bag.

I'm really happy with the bags. They were super easy to make. The instructions for them came from Emma Hardy's Sewing For Children, which, by the way, is a fabulous book if you want to get kids started sewing. I adore her designs and we've had great success with the projects. My older children have even been able to complete them with out any help from me.


Friday, February 18, 2011

giveaway on the right sidebar

sign on as a follower, then leave me a comment. simple! first 15 get something sweet.

*** first 5 followers are in! there are still headbands to give away for the next 10 followers.

4sq baby blanket no. 5 under construction

aside from "out on a limb" i'm working on another four square baby blanket. it's in the border stitching phase. oh, i so enjoy the handstiching on these. i've currently run out of new nephews, nieces, and first cousins once removed to sew them for, so i've begun creating them for friends' babies. this one goes to anne hillstead's little girl, who was born a few months back. a little late, but i need someone to sew for and i admire anne so much. i don't think she'll mind a belated gift. as i've stitched away, i've thought of anne and her sweet little family quite a bit. contemplating them has added another dimension of pleasure to the handwork. i'll be rather sad when this blanket is finished because i've completely fallen in love with the fabrics (from sandi henderson's collection, meadowsweet 2 for michael miller). i'll definitely need to wash this one before gifting because it's been everywhere with me, including soccer games (above) and to the stables for riding lessons. no fear of it's being dirty, i've been very careful of that, but it may have picked up an allergen or two along the way. gotta watch out for those little ones. two more friends from church are expecting soon. lucky me! i'll get to whip up some more.

more "to do"

straightening the bawthroom this morning and decided to photograph the other projects waiting patiently on my shelf. too bad the light was low this morning. or that i didn't bump up my settings to allow more light. you'll get the general idea anyway. touching the fabrics and looking over their wonderful colors and designs, not to mention the darling quilt patterns, got me excited about each one of them all over again.  if only i could suspend time and freeze the rest of my life until they were done. bet that's a common hobbyist's wish. or maybe, more realistically, i could send my family away for a month? (see, i knew i was obsessed.)

the very first quilt in camille rosskelley's simplify book: square one. the pieced, raw-edge binding of this quilt is especially charming. when i saw it, i immediately ordered a honeybun (sort of junior jellyroll at 1.5" wide strips). i went honeybun hunting at the quilted castle. i was already using whimsy for another project, but it was the best honeybun they had, so i got it. the red milk dot print is for my backing.

whimsy, by fig tree quilts for moda, is already slated for a fig tree design: jelly & jam. joanna's palette and patterns are cheery and cozy, with a sun-faded, old-fashioned appeal to them. this pattern was one of the first i bought before i'd ever quilted anything. it's a bit advanced for me right now, but i'm determined to get to it. the quilt will look like the pattern image, with the sprigged flower fabric on the back.

this stack of antique french looking stuff has no designs on it yet. but it was 40% off after christmas. not passing that up! actually, i do have a design from a modern quilt book that might work with it. antique french and modern design? sure, why not.

this pile of fun was supposed to be my second quilt, done in the same pattern as my first quilt, "at last". a mix of modern meadow by joel dewberry for westminster and nest by valorie wells for freespirit    fabrics. i love this collection of fabric. it's something i would have totally hated just a few years ago when i didn't like these colors and turned my nose up at mod designs. the backing fabric, the crazy floral tan print on the bottom, is an absolute favorite of mine. i've bought yardage of it at least 3 separate times now. i'm thinking definitely a bag out of it, too. as soon as i pulled these fabrics out, my infatuation with them was reborn and i thought "why on earth am i not cutting in to this instantly?!" the only explanation i can give myself is that i couldn't resist the urge to work with a jellyroll any longer.


this darling may be my absolute favorite "to do" of all. the green floral is my backing, the green stripe is the inner border, the pink floral is border also, and the white floral is my binding. dream on by urban chicks for moda is dreamy in a very 1970's bed sheets kind of way. i actually have a vintage bed sheet accidentally adopted from my m-i-l that looks very similar to this collection, minus the pink. it's another look i would have cringed at until recently because it was too close to the roots of my childhood. and anything that was cool in my childhood was as ugly and uncool as it could get for me. i always thought the 60's and 70's were the ultimate in bad design taste. until now. suddenly, i love it. maybe it makes me feel young again or at least nostalgic. whatever, just don't sign me up for macrame.

there you have it. enough quilting to keep me busy for who knows how long. a life time at the rate i've been able to touch it lately. must find time, must find time! but i vow to not rearrange my priorities to do. maybe this will get me to organize myself and my household enough so that i can do all of these projects. i fritter time away on a regular basis. if i'd just pay more attention to not wasting moments, bet i can get some quilting done. once the essentials are accomplished, of course.