Saturday, October 18, 2014

"cinched" pattern - part three

 so i'm jumping all over the sewing spectrum around here. yes, i started messing with triangles but now i'm ready to get my three big wips out of the way, to finish them up while enjoying the process. today that meant completeling the flimsy for my new edition of my "cinched" pattern, which i am calling "bloom where you are planted" because of all the blossoms and because it's for a friend who has been uprooted and replanted elsewhere.

i sewed the strips together by first sewing adjoining pairs, then sewing the pairs into groups of four, and sewing those into groups of eight, and so on until the whole top was together. each time, i sewed the seam in the opposite direction i had previously sewn, first sewing from the top edge to the bottom and the next time sewing the grouping from the bottom to the top. to have one consistently straight edge for matching up, i trimmed the bottom edge of the quilt even. since i had modified some of the strips, they weren't all the same length, which is why i needed to trim.

i was nearly done with the top when i left for summer roadtrip. this morning, i put the last three sections of the lower panel together, and this afternoon i joined the lower panel with the top panel and accent strip. it has come together quite quickly.

before i did that last seam, i squared up that lower panel. when sewing with jelly strips, its easy to get distortion where your strips start to lean in one direction or just aren't completely square. (well, for me it seems easy to have that occur.) sewing the seams in alternating directions helps with the leaning. i kept trimming the bottom edge of the sections each time i sewed more strips and sections together, but the top was uneven. by the time it was done, i was 3/4" short at one end. (see top photo)

folded in half and pinned together
 squaring the strips can be confusing because the seams are not always perfectly straight and neither are the edges. i was fairly certain the bottom edge that i kept trimmed the whole time was straight, so next i folded the panel in half across the width (so the strips are still full length), lining up that straight bottom edge and pinning it into place every few strips. i also lined up the two end strips with each other and pinned them. from there i could smooth out the panel and then trim the top edge, opposite the pins, straight and square.

 i did the same with the upper panel and accent strip before attaching because i figured it was easier to work with the small piece rather than try to square that edge when the whole top was put together. and that is true. but i also messed up the trim twice, because it's me, you know. when trying to correct a 1/4" slant, i slanted it further the wrong way and had to trim 1/2". this flimsy is rapidly loosing height.

then i laid the upper section out on my lower section to pin for that final seam . . . and discovered the upper panel was one strip longer than the lower! i think i added that one strip with the intention of taking the other end off so i could shift the accent block over, but it's been so long i can't be sure anymore! i did the easy thing, which was probably wrong, and removed the piece hanging out on the edge.

then, finally, i did my pinning.

and fyi - tip alert - pinning large pieces together while on the design wall rather than on the floor is a lot easier! pin the first piece (at every few strips) to your design board. lay out the second piece on top of it, removing the pins holding the bottom piece in place as you go and replacing them into both pieces so you have both pinned into the board together. then just go back and pin only the fabric together before removing from the board. easy peasy!

sew that last seam in and you have . . .
a completed flimsy!!!
(which still needs a piece of the accent strip trimmed off.)

i have to admit these fabrics were givign me a headache every time i looked at them hanging on the design wall the last few months. they are so darn bright and loud! but now that they are neatly sewn together, they are playing much more nicely and i kind of like it again. except looking at this photo i'm rather wishing i made that accent strip in white instead of green. too late!

my goal is to get the back pieced and the whole shebang basted as a sandwich before the piano teacher comes next wednesday because this flimsy is living on the piano room floor and that means trouble.

the detailed steps for this tutorial are spread over 5 posts i wrote as i made the "bloom" quilt and worked on the pattern. find the others here:

cinched part one - fabric requirements and strip preparation
cinched part two - the accent strip and block, modifications from the first quilt, joining blocks for the long strips
the three-strip accent stripe pieced backing - how to make the backing
loops and crinkles - quilting choices for "bloom where you are planted"
cinched part four - quilting, binding, and gifting
cinched full tutorial

Wednesday, October 15, 2014

angling into triangles

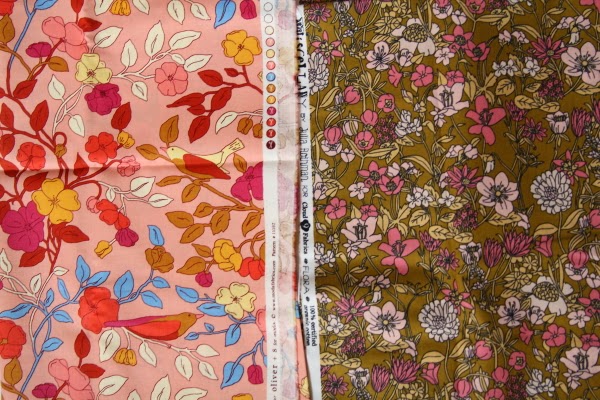
 back in the spring, when i was still struggling with fabric fasting, i picked up this intriguing little half yard bundle off etsy while i was snatching up heather bailey prints. it seemed so vintage and bold in a color palette i wouldn't normally go for. but i have been looking at it and loving it ever since it arrived. after it came, i realized it was "the ladies' stitching club" from liesel gibson of oliver + s for moda fabrics. when that line came out, i thought i didn't like it but apparently i do. funny how that works - you see bits of a fabric range paired together in a unique setting and it actually does appeal to you.


well, that bundle has been sitting atop my bawthroom sewing table being admired for months. sometime during the summer i broke it open and began to pull other fabrics that had similar colors to the shades of plum, pink, gold, peach, ochre, and a touch of blue, that were found in the large floral. i had also acquired another pink and ochre floral print (from "miscellany" by julia rothman for cloud 9 fabrics) that had a vintage, hand drawn vibe to it, which i wanted to use with the stack if possible.

in the end, i got this pile together. it's rather unusual for me, a real departure from my normal palette. it feels like it's either going to be totally cool or a complete disaster. granted, the fabrics are not represented to the scale they will appear in the final quilt. i also think it needs a few more low-volumes and maybe another plum fabric or two to round everything out. but i do not want buy any fabric right now and since this is a longterm project, i can hold off on those for a while.

so what am i doing with this? and why have i started something new again? well, i'm currently taking the "angled" class with rachel hauser at stitched in color. the class has been going for several weeks and so far all i've done is read the material and drool over the photos. i want to make three of the quilts and am really excited to tackle triangles, diamonds, and flying geese! (not "dying geese", right deborah?) but i just don't have time to sew right now. and lately i've realized i mostly just want to finish off the projects i already have going, hopefully by the end of the year, and start fresh next year with new stuff. but, but, but i did want to participate in the class just a little and at least give the new skills and directions provided a try.

so yesterday i tackled triangles.

i'm starting with the "indian blanket" quilt using this radical palette i pulled. i already had one huge pile of fabric i'd amassed when i tried to participate in paula's triangle quilt along earlier this year, but i still want to do that quilt and didn't like that pull for "indian blanket," so i turned my attention to that pile on my sewing table which had yet to be assigned a pattern. i'm kind of excited and also very nervous about it. i'm taking a "well, we'll see how it goes!" approach to all of it. i'm just doing a row or two for some practice, then i'm going to set it aside and finish my boys' quilts. and that "bloom where you are planted" quilt i started on my birthday.

rachel provided directions for cutting using a standard 6" x 24" grid ruler. that was very helpful because it means you don't have to buy a special triangle ruler. but i already own one, so i opted to use that for my cutting. however, my ruler has a blunt tip and after doing all my cutting, i realized that blunt tip cut off 1/4" of the triangle so by following rachel's instructions, i had made my triangles 1/4" too high. darn it. trimming 1/4" off 28+ triangles seemed like too much work and too much room for error, so this particular row will have to just be 1/4" too high. now that i think of it, hopefully that doesn't throw off the placement of the triangles in the quilt too much. "well, we'll see how it goes!" right?

 the blunt tips also threw off the alignment directions rachel had given, so i had to do a bit of trial and error (sewing all three seams on the first triangle) before i got it right. but here's what i discovered in case anyone else wants to know. if you want your on-grain edge (which is opposite the blunt tip if you cut with the blunt tip on the grain edge of your fabric piece) to be at the top or bottom of your row, line the two triangles up with the tips alternating along the top and bottom.

i know this is a really loud and bold pairing of fabrics but i've already decided that if i don't like it, i can always use it on the back! with the sizing mistake i made, i may have to.

 then fold the right triangle over the left one, keeping that middle edge where you'll sew the seam aligned along the diagonal. you can't just pick it up and place on top, you have to fold it over diagonally, which feels like you're folding the triangle down rather than over.

 then align the triangles along the cut edges. the first/bottom triangle will still have it's blunt tip  pointing up and the right/top triangle will now have it's blunt tip in the lower right corner. (you can see a little of the blue peeking out there.)

 now sew down that seam. you'll be sewing the side opposite the two matched pointed tips, aka the side between the two blunt tips.

sew in pairs first, then start adjoining those, which is a whole different alignment issue! it took me no less than three tries to get this right the first time. not having all the dogears made it harder to follow rachel's instructions, but i got it in the end.

i have nearly a whole row complete now! i think i'll do one more so i can see how well my points turn out when i match everything up. wish me luck! then i'll be putting these triangles away and getting back to some straightline quilting.

linking up with lee's wip wednesday at freshly pieced.

Thursday, October 9, 2014

plus a diamond polished off

 yet another one of those quilts i almost finished for last christmas has been completed. even though all this one needed was the handbinding, somehow it still took me 10 months to complete. it's been a slow quilting year for me. d1 and i went on an outing today to photograph her new mama-made quilt and spend some mother/daughter time. when i finished the quilt off on sunday, i sat down and wrote out some thoughts that go along with the finish. so this is a two-part post - the thoughts i had when i actually completed the quilt and the photos from today, accompanied by a few notes from our outing and photoshoot. as you'll see, despite the fact that she is now two inches taller than her mama, she had some issues getting the quilt held up for photos. it fell or her arms got tired more than once. we had lots of good laughs along the way.


 i put the finishing stitches into the binding of another last-christmas quilt today. d1 now has a mama-made all her own to snuggle, curl up in, read under, sleep with, dream on. and although i'm pretty ambivalent about the styling and process of this made-from-a-kit quilt, it does feel good to have it completed and ready to hand over.

 later in the day, the mr and i were discussing some long-needed overhaul to the way our home and life functions. there are so many places in my life where i've failed to live up to my own expectations and ideals, to what i intended to do. kind of like with my quilting, i had big ideas about what i was going to do and be in my life, and i bought all the trimmings to go along with all my grand schemes. and kind of like my quilting, life has worked out a lot differently than planned, and i've been left with a large amount of clutter and unfulfilled dreams. it's time to review priorities, let the excess go, and simplify so that i don't miss out on the essentials.

 as i sat considering where i intended to go as opposed to where i've ended up, it occured to me how complicated even the simplest of tasks and relationships can be: so many options, so many choices to make, so many styles or modes to choose from. i was also thinking of the quilt i'd finally completed. "goodness!" i laughed out loud, "turns out quilting is the least complicated thing in my life!" imagine that. four years ago, as i sat in my first quilting class in front of my old high school singer machine, inwardly trembling in fear that i wouldn't be able to actually do this big thing i wanted so badly to do, i would never have guessed how relaxed i would one day feel making a quilt.

 sure, i still mess up constantly. and sewing a straight line or accurate quilting stitch can allude me, but that mostly happens when i am quilting a sandwich as opposed to when i am piecing a top. the piecing part i've become comfortable with. i have to assume that because i've had a lot more practice piecing than with quilting, that in time that will come more naturally, too. the mistakes i make no longer throw me the way they used to. i expect them now and am usually able to take them as part of the process. but i've got over a dozen completed quilts to my name, actual evidence that i can do this difficult thing. so, really, quilting is not that complicated for me anymore.

 on reflection, i'm only about half way through my hands-on, in-home parenting life with one child nearly three years old and the oldest about three years away from leaving the nest. i had hoped to learn how to be a good mother before my children left home, but that's the thing about parenting (and quilting) - you learn as you go. there's no way to be an expert before you start your real training in the field. so admitting my mistakes and trying to correct them now rather than later is a good move. it's simply time to swallow my pride and seek to make things right like i've been able to do with my quilts. eventually i'll have 7 grown children that will hopefully be proof that i learned how to parent.

end of original musings


 the quick facts on this quilt: it's made from a kit my local store put together of a pattern by carina garnder for her dainty blossoms line for riley blake fabrics. except that i decided to put it together during a quilting class, so i ended up using triangles-on-a-roll to make the chevrons rather than the pattern. whatever. it's a chevron quilt i did zero design work on and my daughter, d1, asked for the quilt when she saw the store sample. the only bit of original design that ended up in the quilt is the row of white diamonds i accidentally made when i sewed one row together incorrectly. hence the name, "plus a diamond." the back is pieced from one large bit of ditsy floral and a strip of the green dot i used for the binding, which then left me short on the binding, so i had to piece in bits of other scraps for my first scrappy binding.

 after taking our photos, we went into the coffee shop for lunch, but settled on a sweet instead because d1 decided she didn't want a sandwich but an actual burger from the grill also on site.

 i die over their arrangements every time i come in here. just looking at it is delicious enough most days.

 and that right there is what i would have chosen: devil's food cake. but d1 picked the double chocolate buttercream instead. i warned her it was vegan, but she wanted it anyway and it turned out to be scrumptious. we grabbed her treat and then our lunch at the grill, where we laughed a whole lot more. especially when a pea i was admiring before consumption suddenly jumped to the floor.

this particular daughter is quite happy-go-lucky and cheery. she laughs a lot, which is good for me. it helps me relax sometimes when i'm so unnecessarily uptight. she's made my entry into parenthood relatively easy, although i admit she was pretty high maintenance as a baby. still, she's a great kid and has helped me navigate the parenting waters with all her natural goodness. more than anything, she knows how to laugh at her crazy mama. i love her to the moon and back.

when we were leaving, d1 said, "so when i finish my quilt, can we do this again?"
absolutely, sweetheart.