gypsy wife friends, if you are in need of the pdf files of the block or strip charts, i now have them available to you with only a click! the dear rachel hauser, of stitched in color, tipped me off on how to embed the pdf file link by uploading to google drive. hallelujah! now you don't have to wait for me to email and i don't have to worry that i forgot to email them to you. if i did (shame on me!) forget to email the files to you, now you can skip right past me and download them yourselves.
march is winding up, so it's time to complete section two and link up your posts below.
no one minds that mine is still technically in 5 pieces, right? that will be dealt with shortly.
how did this month go for you? i know pershing was quite a block to tackle. still, i have seen many section two's completed on instagram. i think in general it was an easy-ish month/section. hardly any strips this time around.
the main complaint i am hearing is people are having difficulty in getting the sizing right on section pieces which leads to them not matching up well. if you are experiencing this, you are not alone! this is such a huge frustration after all the work put into individual blocks. i think the key here is in the scant 1/4" seam. i've noticed that even when my component pieces are perfectly sized i can have trouble with the block being a bit small. just the nature of working with so many intricate pieces, i suppose. so if my pieces are accurately sized, it has to be my seam wherein the problem lies, right? it's not too hard to adjust for that when a few pieces are going together, but it can make a big difference in the areas where there are lots of pieces or strips. my best advice is master that scant 1/4" seam and keep trucking. i know we all want these labor-intensive quilts to be perfect, but i'm told by the veterans that it's such a busy quilt, the little faults tend to get lost. so let's just keep going, shall we?
did you know that even those spectacular 1/4" piecing feet you buy for your machine need to be checked? if you are having sizing issues, i suggest you check your foot for accuracy. and the next step is to figure out the scant 1/4" seam, which basically means you are sewing a thread or two less than 1/4".
for some guidance on the scant 1/4" seam or how to find out if your machine foot is accurate, check out some of these tutorials:
you know what else is giving me just a bit of trouble? keeping track of my strips! goodness, they switch places quickly. currently, i have a whole section on design wall A where i am storing the strips in order. some of them are already cut into the smaller sections, so i just layer them together in their place. i've seen some ladies label their strips with the id numbers i assigned them. very smart!
so how did you do?
what do you think about this section and it's blocks?
any tips or suggestions for others who will be doing these in the future?
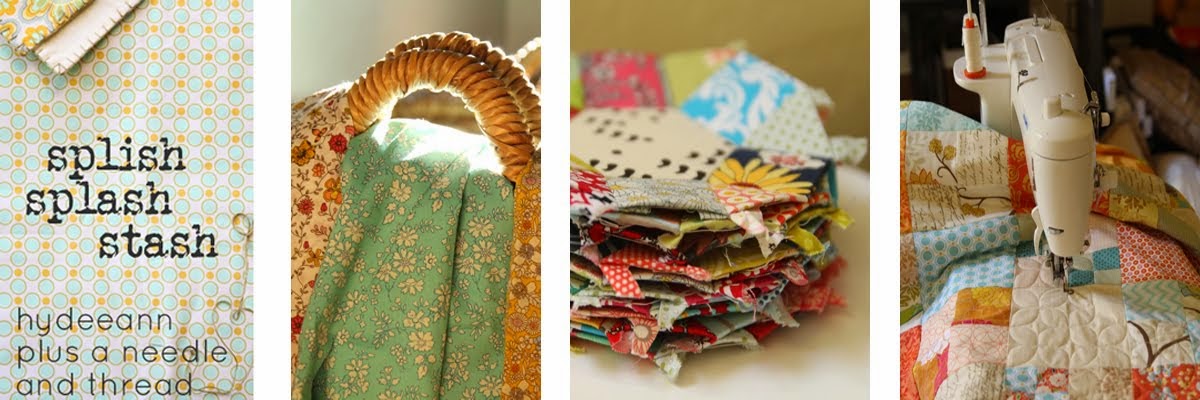
for a little over a year now, i've had these pinwheel blocks sitting quietly on the backburner, coming out to play occasionally when i needed a break from other projects. i'm in no rush on this one. it'll likely be a holiday quilt, only out on special occasions, so i'm not feeling pressured to finish it quickly. especially since it's intended holiday has already passed for the year.
i originally saw this lovely photo on instagram last year and fell in love with the simple pinwheel patchwork in sweet colors. (i know, more hsts in a basic patchwork layout. what can i say? they really appeal to me!) the fabrics reminded me of a stack i had sitting in my stash. it was a fat quarter bunch i had acquired from the quilted castle very early on in my "brand new quilter, must build a stash, frantically buy anything and everything" days. like most everything i bought at the time, it was fabric that appealed to me on some level, but didn't really fit my evolving quilting style.
it contained exactly the kind of romantic, blowsy, english floral prints i loved in high school and college, which is probably what attracted me to it. however, some of the prints are a bit too bold for my current taste, so it's been sitting on the shelf for over 5 years now. when i saw that pinwheel quilt, i figured it would be a good setting for the sugar flower fat quarter set. sure, it's loud and very sweet, but i think i can handle it as a valentine's quilt that makes an appearance for about a month every year. there's room in my life for all kinds of quilt and fabric styles.
and i do really like some of the prints.
i'm still a sap for big rose prints in pretty colors.
so a sugar-sweet valentine's quilt it will be.
when i showed a peek of the project previously, there were some commenter questions about the fabric line i was using, so i'm sharing a bit about that now.
it's a "flower sugar" collection circa 2010, from the japanese fabric company, lecien. from what i can gather, lecien produces a new "flower sugar" collection each year, maybe even seasonally. the fall 2015 collection, the most recent on the lecien site at this posting, has colors (sans yellows) close to the same as my stack, and incorporates similar florals and dots, as well as lace and gingham prints. the "flower princess" line is very similar, but in a softer, low-volume palette. an internet search of "lecien flower sugar fabric" will yield links to all sorts of pieces from past collections, too. if you add a year in there, you'll get more specific feedback. for lots of images of past collections and prints, visit kit newlin's lecien flower sugar pintrest board. if you want to buy, not just look, check out what's available on etsy.
as for my quilt, i have completed somewhere around 20 blocks. thanks to my floppy book/flat block pressing technique, they are all staying nice and flat in their pile while they wait for the rest of their block friends to come play. i have yet to decide on quilt dimensions, but i'll likely use a 7 block x 9 row layout, like i did for my "dreaming easy" quilt. this means i'll need about 40 more blocks before i'm ready to assemble the top. i'd like to add a coordinating solid or two to the mix, to tone down the happy madness.
but i've got until at least next january. so no sugar rushing here.
i've got a new fabric crush. sure, meadow dot in robin's egg/mint/aqua/whatever is still my favorite. that hasn't changed. but i've found a dreamy low-volume that makes for a perfect background or supporting fabric. every batman needs it's robin, and all those lovely feature fabrics in our stashes also need something to shine against, to help them stand out.
that's where this lovely woven stripe in natural from moda's pure simple line comes in. i stumbled across it at my lqs a week or two ago and got 1/2 yard because i knew it was going to be a brilliant supporting fabric. well, i've already used it a number of times in a few projects (here and here), so i'm thinking i need to go back and get about two yards more.
this fabric is a woven, which means two colors of thread were used to produce the stripe pattern rather than it being printed on the background fabric. this means no printing on the selvage since no printing was used in it's production, just like why solids have no printed selvage. also, i don't know if different thread was used in this line or if it's just because there's no printing on it, but the hand to these wovens is so lovely and soft.
this woven stripe fits right in with a type of fabric i've been collecting lately. i call them my "jen kingwell basics." while pouring over the quilts in jen kingwell's quilt lovely, i noticed she uses basics in a very interesting way. while she has a riot of color and fabrics going on, she balances them with basic prints in neutral colors. lots of these neutrals have an antique feel to them, sort of an aged look. they are prints you'd find in a more traditional quilter's stash (maybe even a civil war quilt stash) rather than in the hottest new designer lines. at least that's the feel of them to me. the selection i show above is a low-volume version of what i'm talking about. a look at her quilts will show that many of them are deeper in intensity - browns and grays rather than just whites. i think these fabrics produce the antique feel many of her quilts have.
take a look at some of the quilts from her book and maybe you can see what i'm talking about.
the subtle stripes that run between the pinwheels in this quilt are one low-volume example of what i'm referring to. i just love the barely-there look of them between the columns of the pinwheels.
a look at the pinwheels themselves will also show many of these neutrals in use.
"glitter" is chock full of these neutrals, especially for the background piece in each block.
i was really hoping her first fabric line, gardenvale, would have lots of these supporting prints in it, but it did not. maybe her next lines will include more.
so i just visited moda's website and it looks like "just a speck" will have some. and "behind the scenes" is all about neutrals, too. yay! that makes it easy.
the low-volume neutrals are in the background here, while the darker neutrals are in the swirly portions of the blocks themselves in this quilt.
this is the kind of stuff i pick up over time as i study pictures of quilts i like. identifying such features helps me use fabrics and colors more effectively in my own quilts. thank you, jen kingwell for the lesson in neutrals and for helping me appreciate a family of fabrics i would have passed by before.
and thank you, moda, for that delicious woven stripe!
gypsy wife calls for two 8.5" hst blocks that consist of 16 - 2.5" hst component pieces in a 4 x 4 layout. its very simple and straight forward. i'd seen blocks that used uniform fabric through out, and blocks that were completely scrappy. i was leaning toward using some sort of unifying fabric or layout concept, like placement of light and dark fabrics, a monochromatic color scheme, or one feature fabric for half the triangles, so the block would look like one cohesive block rather than just a collection of mini hsts in a segment of the quilt.
however.
i had several hst units in the correct size that were leftover bits from earlier block making for this quilt. i decided that for at least the first hst block i would go completely scrappy within a certain color palette that all my units already happened to fall within: light yellow, pink, turquoise, pale green, candy apple red. actually, i really wanted to keep it pastel, but one of the blue flea market fancy pieces was predominantly showing the red flower in the print, so i added that red to the scheme. i'm so glad i did because i feel the red gives it some depth and balances the lighter colors nicely.
the block came together in no time, really.
the formula went like this:
make 16 - 2.5"uf component hst units
layout in 4 x 4 grid
chain piece pairs of units together
assemble rows of 4
sew rows together
now, because i'm focusing on improving my precision for this project, i also did the following along the way:
press each seam after sewing
trim the component units to precisely 2.5"
to reduce bulk, press the seams adjoining the component units open
use a scant 1/4" seam
pin for seam matching
again, a scant 1/4" seam was helpful. i trimmed my component units to 2.5" each with my little ruler, so i know my unit size was spot on. if my block was coming out a bit shy, it was because i wasn't sewing a consistently scant seam. i've found this to be key with all the sewing on my gypsy wife project. master that scant seam!
also, i wanted my seams to match up across the rows, so i pinned at the three seam intersections.
when doing a simple block like this, it's easy to take the time to do all the little extras i might not normally focus on in a bigger project.
so here's the fun news:
i liked the results of my first block so much that i began envisioning an entire lap quilt made of hsts in this color palette! as i admired my pretty little block, i just wanted to multiply it and expand it into something larger.
i've just been reading jeni baker's hst handbook, the half-square triangle: foolproof patterns and simple techniques, which probably further influenced my desire to work with the hst. jeni's book covers several concepts to explore with the hst but i was hankering to just do a whole entire quilt in a very basic layout. color palette was going to be the primary concept i would work from within that simple shape. no fancy layouts, just plain hsts in a pleasing range of hues.
the gypsy wife's 2.5"uf/2"f hsts were a bit too tiny for a whole quilt, but i also knew if i changed the size of them too much, i'd be altering the scale of the fabrics and their look in the full quilt. i played around with the math and decided on 3"un/2.5"f hsts instead. not much of a difference, but different enough.
and i reigned in my desire to make a large quilt. lately i find myself making patterns just a bit larger so they tend to fall more into the twin-size bed quilt range rather than a lap quilt. i always think, "well, it's almost big enough to cover a bed, why not just make it that much bigger so it can be used on a bed, too." or i worry that a throw quilt won't be sufficient cover for snuggling on the couch, even though they always are. but since i didn't want to commit to too many hsts, i scaled back to a true throw/lap size.
this means i'm making a quilt that's:
52.5" x 67.5"
21 hsts across by 27 rows down
567 - 3" component hst pieces
568 - 3.5" squares
15 sqs cut from each of 40 pulled fabrics
that's a whole lot of hsts! but i'm feeling up for the task. there is something satisfying about basic patchwork and the simplicity and rhythm of a basic patchwork quilt. it balances out the more complex designs and projects i'm working on. and i've reconciled myself to trimming each of those units. it doesn't take that long (although multiplied by 568 it's a lot) but it does make a difference. trimming is another of those tasks that used to drive me crazy and feel like a waste of time, but that i've come to accept and appreciate. so trimming it is. this will be a project i can work on in bits and pieces between others. making a batch of hsts here and there will break up my more intense projects or be something quick to do when time is limited.
like i mentioned, i'm working in a color palette as my main concept: light yellow, pink, turquoise, pale green, candy apple red. value is also playing a role in that i'll be using the lighter prints on the left side of the hst and the more intense prints on the right.
the upper/left triangles will be mostly yellows, the softest blues and pinks, and some neutral low-volumes.
the lower/right triangles will be these brighter blues, pinks, bits of red, and a few intense yellows.
that's the plan!
my gypsy wife is having a baby. that's how i think of it, anyway, since the one block from the first project has inspired a whole new quilt. projects beget projects sometimes.
the gypsy wife quilt calls for two old maid's puzzle blocks. it's a fun little block with lots of room for fabric play. there are two types of component pieces included in the block: a bow tie piece of hsts and squares, and a crazy triangle/hst mash up piece. both of my blocks use uniform fabrics for mirrored sections of the block, but you don't have to do that. you can use as many fabrics as you like!
A photo posted by A Pieceful Journey (@apiecefuljourney) on
or, instead of totally scrappy, to define this block in an already crazy, scrappy quilt, you can use just two or three fabrics for the whole block.
now how to make it.
first, decide on your fabrics, and which you want to use where. i selected a low-volume stripe for my background, the red with white flowers for my bow ties, the yellow pinwheel fabric for my large triangles, the red ditsy floral for my "background" triangles in the "crazy" piece half, and a dot for the inner triangle in the "crazy" piece half (which i later changed to a blue and white dot for a bit more color).
here's a diagram from the pattern that i will use to explain fabric placement.
i'm calling the upper right and lower left component pieces "bowties." the upper left and lower right component pieces i'm calling "crazy hst" (for lack of a much better term). the crazy hst is composed of a large triangle and the crazy side, three background triangles and one inner triangle.
the bowtie component has two hsts and two squares. i used only two fabrics for this piece - background B (two squares and two hst halves each piece) and bowtie fabric A (two hst halves per piece).
the "crazy hst" has three fabrics - the large triangle fabric C, "background" fabric D (three triangles per piece), and the small, inner triangle fabric E.
quite frankly, although i've followed the pattern instructions for this block twice, i've never been sure exactly which fabrics ms. kingwell is referring to in the cutting directions. and i altered those cutting directions, anyway, so i'm going to give you my version of the block directions. it comes out looking and measuring the same, so pick your preferred method!
i do apologize for the photo lighting quality here. it was night and there was nothing i could do about it. i have to quilt when i can, and that doesn't always make for ideal lighting. thank goodness i'm not a sponsored professional, right?
from the background fabric B for the bowties (my stripe), cut 2 - 3" squares, and 4 - 2.5" squares. (the top two are doubled up in the photo, so you can't see there are four. actually, i forgot to cut them the first time around, but pretend with me.)
from bowtie fabric A (red w/ white flowers), cut 2 - 3" squares
from large hst half fabric C (yellow pinwheel), cut 1 - 5" square, halved diagonally
from crazy hst background fabric D (ditsy floral), cut 3 - 3" squares
from crazy hst inner triangle fabric E (blue dot), cut 1 - 3" square
note - all my squares are slightly overcut and will require trimming of individual component pieces so your block comes out correctly sized.
now, if you are going more scrappy than this with your fabric choices, you will have to work out how many more squares you are going to cut for your hst units and all. basically, for each different colored triangle you want to use, you will need one full square to cut it from. the pattern says to cut all the squares in half and set aside/discard/scrap one of the halves from each fabric. another option is you could make hsts from all of them and set the extra hst aside for the hst blocks that are in sections 4 & 5 of the quilt. your choice.
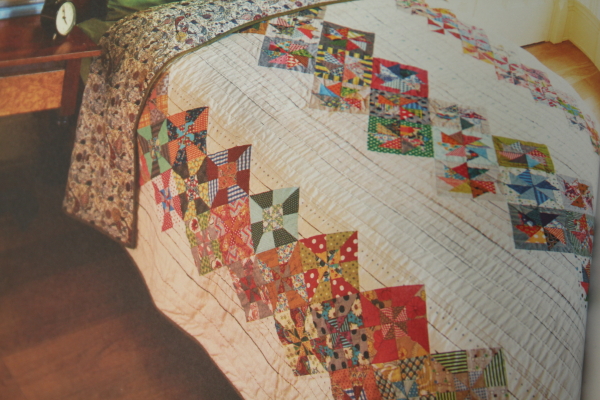
take the 2 - 3" background fabric B squares and the 2 - 3" fabric A squares to make your 4 - 2.5" hst squares for the bowtie components. with your favorite marking device, make a diagonal line from one corner to the other on the wrong side of the lighter fabrics. (if you are using a directional print, like my stripes, make sure you have them facing the same direction when you mark them.)
place your squares wrong sides together and sew a 1/4" seam on each side of the diagonal line.
cut along your line, and press the hst units open.
these are slightly oversized, so trim to 2.5" each.
arrange your bowties, and sew together. again, if you are using a directional print, pay attention to where you place your fabrics so they run the same direction. i thought i was going to have stripes running in two directions until i flipped both my component pieces to exactly how they would appear in the final block.
once it's assembled and pressed, the bowtie components should measure 4.5" each.
now let's make the triangle half of the crazy hst components.
take one of the 3" squares of fabric D background, and the one 3" squares of fabric E, and make two hst units, just like you did for the bowties. trim this to 2.5" after you press open.
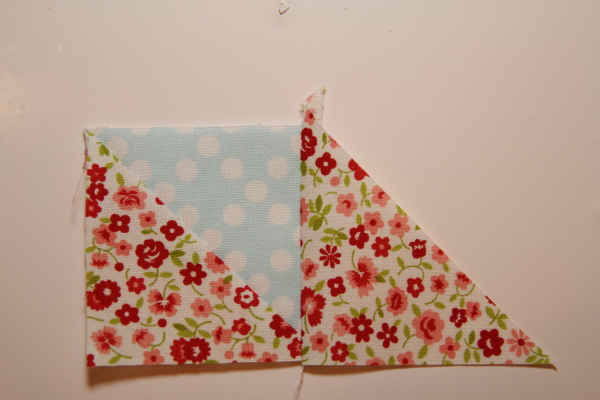
take another of the 3" background fabric E squares, and cut in half across the diagonal, forming two triangles. lay out your half crazy hst component as it will appear in the component piece. the long edges of the triangles will be on top, looking like and arrow pointing down. the hst unit will be in between them with the background piece on the bottom.
take the triangle on the right of the hst unit, and fold it over so the right angles are lined up. this will look really big and wrong, but it's not. you'll have about 1/4" of the triangle hanging out past the square on each side, but if your edges are lined up and your right angles match, you'll be good. sew on with a scant 1/4" seam along the right side of the hst unit.
press open. now they are starting to look more the same size!
put your sewn pieces back in place so you can see where to go next.
now fold the left side triangle down over the hst unit, again matching the right angles together, and aligning the edges of the square and triangle. sew with a 1/4" seam down the left side. press open when done.
next, trim your triangle along the bottom/longest side. do this by lining your ruler up with the tip of that inner triangle 1/4" away from the edge. this will give your the proper spacing to keep your inner triangle edge. also, you can see i aligned the right edge of the piece with the 45degree diagonal mark on my ruler. this will ensure your new long edge is angled properly while still being distanced from the point at 1/4".
then line up one of the large triangles (fabric C, yellow) with your crazy triangles half, right sides together. if you're like me, the crazy side is probably slightly larger. so i just made sure my two long sides were aligned, and that there was approximately the same distance on each side of the points so that the triangle would be roughly centered on that crazy half. sew together with a 1/4" seam and press open.
once it's pressed open, you can trim the component down to it's 4.5" size. to get the best placement and to retain my triangle points, i made sure the diagonal seam line of the piece lined up with the diagonal marking line on my 4.5" cutting ruler (both yellow, so difficult to see here), and that the outer points of that small (blue) inner triangle were 1/4" away from the ruler's edge. if you have to choose, go with the out points so they don't get cut off.
now, arrange all four component pieces (4.5" sq, each) in the configuration shown in the pattern diagram, and sew together with a careful scant 1/4" seam. the final block measures 8.5" unfinished.
the pattern calls for two old maid's puzzle blocks, so make another one right away if you're feeling crazy. otherwise, you can wait until section 8 comes up.